How To Take Professional Quality Photos Without Buying Expensive Gear
It’s a no brainer that when we travel, we want to document the experience. Whether you’re hitting the trails or hopping on the bike, it can be difficult to capture the beauty of your trip the way you really want to. Often times our best and most convenient option is to use our phone for travel photography. Rather than investing in expensive gear to up your photo game, we’re lending some quick tips to help capture the moment with what you currently have and elevate your photo memories.
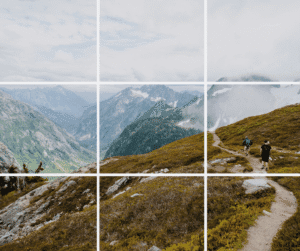 1. Rule Of Thirds / Perspective
Consider composition when taking your phone photo. It’s easy to hold up the phone, aim, and click, but a little more intentionality goes a long way. Using the ‘Rule Of Thirds’ is a great way to make your composition feel more professional. Mentally divide your image into thirds (shown in photo). Then, place the subject of your photos in one of the “thirds”. To make this even easier, set up the grid feature on your phone. Underneath settings, go to “camera” and turn the toggle for “grid” to “on”.
2. Expose Your Photo
The next step is to properly expose your photo. This means your image is getting the best amount of light to feature your subject. One way to make sure you have correct exposure is to tap where the subject is on the screen. Doing this auto-exposes your image to suit the place you tapped. Feature bonus: use the HDR feature on iPhone to achieve even better exposure. This feature will take 3 photos at different exposures and combine them. To access this, go to settings, select “camera”, and make sure “Smart HDR” is toggled on.
3. Take Sharper Photos
Once everything is properly set up and exposed, you’re ready to take your photo. To up your photo game, use the volume button instead of touch screen button to achieve the sharpest photo possible. If you’re using your touch screen, you risk some shakiness, as the photo doesn’t take until your finger releases from the screen. Using an actual button will make the photo less shaky.
4. Photos, Photos, and More Photos
Most times people will take one or two photos and call it good. To ensure you’re getting the best shot, take a good number of photos. With iPhone you can even use the “burst” feature. By holding down your finger on the shutter, the phone will capture rapid photos until you release. When capturing movement, the more the merrier. Professional photographers always keep their shutter going, and you should do the same. You’ll have more to sift through, but will get more key moments.
5. External Gear
If you’re wanting to take your skills up a notch without hauling heavy gear, consider a couple pieces of gear that can greatly elevate your photo game. The first is an external lens attachment. Phone lens attachments will allow for higher quality photos without the high cost or bulkiness of a professional camera. We love these Moment lenses. You’ll get better zoom and higher definition. The second piece is a phone tripod. If you’re an avid traveler, this tripod will be the perfect sidekick, allowing you to utilize your surroundings to get the best shot on self timer mode.
6. Post Production
The last way to enhance your photos is to edit your batch. There are plenty of third party apps you can use to begin playing with editing. Some of our favorites are VSCO and Adobe Lightroom (both are free!). Don’t want the apps? No worries. Click “edit” when looking at a photo to use the built in features from your phone.